About Me

My photo
I love using paint and paper to create a cozy cottage feel for my home. I am wife to an amazing man and mother to a very creative 7 year old.

Monday, October 7, 2013

Sprucing up the Master Bedroom part 2

After painting the metal bench I showed you last month, I decided next to paint our dressers.  We have had our bedroom furniture for over 15 years...and it was hand-me-down back then.  I have never really liked it, but didn't know what I wanted instead...plus getting new furniture is expensive!

Here's a pic of the before of my husband's dresser:


I had thought about painting it before, but the high gloss cherry finish had me nervous.  It seemed like it was going to be a ton of work sanding it down and prepping it even before getting the paint out!

What motivated me to get started was a good friend of mine. I was showing her around our house.  When we got to our bedroom she said, "this room is not you".  I want to be clear that this did not offend me at all!  She was totally right and I am thankful for her words because they got me to do something about it!  She was the motivation I needed.

I had heard about Milk Paint from Miss Mustard Seed Blog (missmustardseed.com) and loved that look that it gave to the furniture she featured.  I watched some of her how to videos and when I realized I didn't need to sand the dresser, I was sold!  I ordered some of the paint online and chose Shutter Gray.

I quickly wiped down our dressers and removed all the hardware.  I ended up taking out the middle piece that looks like a keyhole and filling in the holes with wood putty...I wanted to try to simplify the look of the dresser.

 
After removing all the drawers I was ready to paint.  I followed the instructions for the milk paint which included adding a primer to the first coat.  Then I used a paint brush and started painting.


The first coat looks, um, terrible.  Don't freak out!  It gets so much better! 


It didn't take long to paint the dresser and all the drawers and I gave them 2 coats and went over a couple spots a 3rd time.  After letting it dry for a bit I got some sandpaper and rubbed off some of the paint in spots where I thought the piece would naturally wear.

For the hardware I considered buying new handles until I saw the prices!  A can of metallic spray paint did the job for just a couple bucks. 

While the hardware dried, I did a coat of wax over the paint on the dresser.  This protects and seals the paint.  It's super easy and gives the surface a smooth finish.

Then I just had to put the hardware back on and slide in the drawers...and I was finished!  I was so happy with how it turned out.  I am guessing that all together it only took 3 or 4 hours to complete each dresser (I did them on 2 different days).


Here's both of our dressers completed.  I did my dresser in blue for a little bit of contrast. (And yes, we have a ginormous t.v. in our bedroom!).


I was super impressed with Miss Mustard Seed's Milk Paint.  I love the way the paint looks on our furniture and it was so easy to work with.  Did I mention it was low VOC?  Even better!

Next time I will show you how I painted my husband's night stand...and what I found behind the drawers!  Hope you are enjoying these little projects!


Thursday, September 12, 2013

How I Store My Stamps


 I have a bit of an obsession with stamps.  I love using stamps in scrapbooking, making cards, and even home decor.  I especially love Lawn Fawn stamps (lawnfawn.com) and have collected quite a few sets.  I have been storing them in their original packaging, but it wasn't working well for me...especially when my son enjoys using them and he was having a hard time getting them back in the packaging (he kept splitting the sides when trying to fit them back in).  Lawn Fawn sets come with a bunch of amazing stamps and some are tiny...I don't want to lose a single one, so I need to put them in something!

There are many great ideas on the web of how to store your sheets of acrylic stamps.  Some inexpensive options were using plastic bags, but they didn't look sturdy enough...they didn't really solve my problem.   Others recommend using plastic CD sleeves from office supply stores which look great and seem to work well, but when I added up the cost, it was more than I wanted to spend.

So, I raided my craft area/homeschool supply area and came up with an idea and because I had supplies on hand, they didn't cost me a thing!  Perfect!

Here's what I did:

First I got plastic sheet protectors that would go into a 3-ring binder (I looked up cost and they run about $15 for 100 and each will store 2 sets of stamps), a trimmer and a stapler:


I then took a set of stamps and decided I wanted the pockets to be 7 and 1/4 inches tall.


Next I trimmed down the sleeve going across the top (opening side).


I then trimmed off the white part that with the holes that would be used to place in a binder normally.


I forgot to take a pic (oops!), but I then folded the pocket in half and stapled on the folded line twice...one about 2 inches from top and another about 2 inches from the bottom.  You can see the staples in this picture with the stamps inserted.  The staples allow you to put 2 sets in one insert and keeps them from sliding into each other.


With smaller sets I decided to keep the cardboard insert which helps keep the pocket from bending.


I found that the pockets also worked great for my stamp sets that had matching dies (again I kept the cardboard insert to keep pocket from bending).


Here are all my sets in the drawer that I use to store them:


I have been using this system for a month now, and  it's working great.  I can flip through my sets quickly to find what I need. I also like using the cardboard inserts for the dies because they stick up a bit and I can find them easily.   AND my son has been able to use them without any issues...problem solved!

I love when to have my stuff organized and especially like it when I can do it cheap!

Have you solved any organizational problems lately?  I can always use extra help, so please share!


Tuesday, September 10, 2013

Surprise! It's Kelly Marie's Birthday Party Blog Hop!


Welcome all of you from Kelly Marie's Birthday Party Blog Hop!  If you are following along on the blog hop, you just came from Tiffany's Blog.

I am so excited to be a part of this blog hop.  First, because Kelly is a really good friend of mine. I am so blessed by her friendship...she is so sweet!   Secondly, this is my first blog hop ever!  I was so excited to be invited to participate...I just started this blog in June so this is all still very new to me.

Here is the card I made for Kelly:


For my background papers I decided to go with teal and yellow since I know Kelly likes those colors (and so do I!).  I was inspired by all the chalkboard art I have been seeing on Pinterest, so I combined several different sets to come up with a similar look.  I just rubbed a piece of chalk on the paper to complete.  I had to add some of the new silver sparkle Lawn Trimmings...I love it!

I love the vintage look of galvanized metal so I took some Pumice Stone Distress Ink and rubbed it directly onto white cardstock.  After that, I sprayed it with water mixed with some Perfect Pearls.  I then used the stars included in the Stitched Journaling Die Set to cut out these adorable tiny stars.  It's hard to see in photo, but they really do look like they are made of metal.  I think they add a nice touch!

Happy Birthday, Kelly!!!  Hope you enjoy an amazing day!


Make sure you visit all the blogs in today's hop!  So much inspiration and creativity!  Your next stop on the hop is Laurel's Blog


Monday, September 9, 2013

First Week of Second Grade!

Last week Cole started second grade...and so did I!  We began our 3rd official year of homeschooling together.  I love that I get to spend so much time with my son and that we get to learn new things together. 


My goal this year is to be more structured.  Cole thrives on structure and so I am working on making our days more predictable for him.  I tend to wake up in the morning and decide what to do based on how I am feeling which worked for younger grades, but now I need to change my ways! 

Another change is that we will be doing the majority of our homeschooling in our garage.  I spent time this summer working on making it a more usable space (you can check out my post on it here: garage redo ).  In the past we used the kitchen table, but it stressed me trying to clean it off for meals.   Now we have a space that is always ready for us to do work...it also doubles as my craft space so I can create a card while Cole works on a worksheet...bonus!!!

This first week went really smoothly and I actually liked having a schedule to follow and a space that is dedicated to doing school work.  Cole seemed to really like it too!


Wednesday, September 4, 2013

Sprucing up the Master Bedroom

At the beginning of summer I had a long list of projects I wanted to complete.  One of my main goals was to work on sprucing up our master bedroom.  Over the next couple of weeks I will reveal some of the projects I have been working on and then show you the whole room reveal...suspense!  (It's even a surprise to me since I still have one more thing I'm trying to work on!)

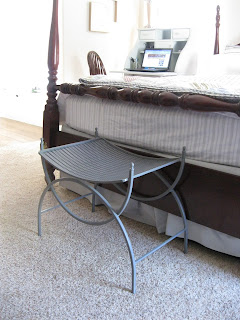
One of my first projects was this iron piece I found at a garage sale for $8.


I loved the size and shape of the piece and thought it would work well in my bedroom.


I did not love the color, though, so I got out my trusty gray spray paint and gave it a make-over.  Remember that several light coats are better than heavy coats that can cause ugly drips...I always have to remind myself of that because I want to hurry up and see how my project will turn out!


Here's what I ended up with after several coats of spray paint...looking good.


This little bench seat works perfectly at the foot of our bed.


I always go for form over function (not the most practical person), but this time I got both.  The bench works perfectly for my husband to set his business travel suitcase on it.  He was plopping his suitcase on our bed which grossed me out...what germs were on it after pulling it through airports?  yuck!  Now he has the perfect spot to set it down while packing which makes me very happy.

I love the power of spray paint!  Have you ever used it to transform something in your home?  I'd love to hear your ideas!

Monday, September 2, 2013

This Week's Card

Here is my card for this week...woo hoo!  I've done it 2 weeks in a row! I am also submitting this to the "these are a few of my favorite things" Lawnscaping Challenge http://lawnscaping.blogspot.com.


I made this for my sweet sister who had a baby girl last week!  So excited to have a little girl in the family now!  Babies are definitely one of my favorite things!

I used my new favorite Lawn Fawn deer stamp http://www.lawnfawn.com.  It is so sweet!  I also used Lawn Fawn dies which I love.   I used my new favorite shadow inks (came in the mail last week) from Hero Arts http://shop.heroarts.com.   Oh, and I couldn't resist using my white gel pen to add the white spots on the little deer!

I love how girly and soft this card looks.  I hope my sister likes it!

Tuesday, August 27, 2013

Card Making Tuesday

So far I haven't posted a card a week like I would like.  I also would like to come up with a fun name for my weekly card post...any suggestions? (Card Making Tuesday is pretty lame!)

This card was made using Lawn Fawn stamps (http://www.lawnfawn.com).  I love this hot air balloon!  It has a matching die which makes it super easy to cut out.

The cloudy sky paper is from a Maggie Holmes (http://maggieholmes.typepad.com/) collection.  I love her paper...and I got to meet her when I went to CHA!  I was a complete dork, though.  My friend Kelly introduced me to her, but I didn't catch her name...then I started looking at her booth and realized she was Maggie Holmes.  So what did I do?  I (very) loudly turned to her and shouted, "You're Maggie Holmes?!?!". Um...yeah...complete dork!   Thankfully she was super sweet!


 I have this card in mind for a particular friend of mine in Ohio.  Just want her to know that I treasure her friendship and think of her often!


Monday, August 26, 2013

I Survived VBS Crafts!

Actually, I did more than survive!  I had an awesome week hanging out with the craft team and meeting all the kiddos that came through the craft room.  It was a lot of work getting ready and making plans, but it was so worth it!

This is my 3rd year leading crafts, and this year I had my friend Kelly as a co-leader who made the whole process a lot smoother.  Every day we did a different craft, but every age group did the same craft that particular day.  This really helped simplify the process--in past years I sometimes had 2 different crafts for the day depending on the ages.  We did adjust some of the decorating supplies based on age, though (sharpies and paint were kept from Preschool and Kindergarteners for the most part for obvious reasons!).

We had a team of 5 women and each of us sat at a different table.  Most of our tables could sit about 5 kids.  After the kids found their seats, each craft team member helped the children at their particular table with the craft.  I was so thankful for the team that God brought together.  They were all so easy to work with and I had so much fun with them all!  Here is a pic of all of us together (love that we have a rainbow of shorts on):


Each day we had 6 different classes come through our room in 2 hours...with no breaks...whew!  I didn't have time to take any pics during the classes, but instead I have my amazing son Cole to model for us all the crafts that we made! 

The theme of our VBS was Superheros, so for Day 1 we chose the most obvious craft--superhero masks and capes.  We ordered the masks and capes from Oriental Trading Company.  The capes came only in the color white, but we were able to dye them different colors.  We cut out each kids first initial out of felt and had felt glue to help them adhere it to the cape.  We let them use large gems, markers, and stickers to decorate their capes.  They used markers and crayons to color in their masks.

Check out the cape and mask Cole made:


For Day 2 we made journals. We used simple composition notebooks found at Walmart for 50 cents each.  At Michaels I found a 12 x 12 pad of paper that was superhero themed and used strips of the paper to cover the notebook logo (trying to disguise the fact that they were just basic composition notebooks).  Then we loaded our tables with stickers, markers, gems, and washi tape and let the kids go nuts decorating their books.

The washi tape was a huge hit!  I had found some on clearance at Michaels (75 cents a roll) and the kids loved it.  It was super easy for the kids to use and it went a long way which was awesome!  I joked that I did my craft duty by educating all the children at VBS about washi tape (I heard some kids calling it "washing tape" and another sweet girl called it "walkie talkie tape" lol!) 

Cole has been using his journal to draw/write in during church on Sundays.


Day 3 was noisy!  We made Domroo drums also ordered from Oriental Trading Company.  Again we provided the kids with stickers, markers, and more washi tape.  We also added in feathers, yarn and paint which was super fun.


Day 4 was tote bags (you guessed it...ordered from Oriental Trading Company).  This craft is now a VBS tradition.  I was kind of worried doing this craft for the third year in a row, but was encouraged when several kids asked on Day 1 when we were making the tote bags!  The kids love this day because we let them use puffy paint...yes, it is crazy, but so fun (no, really it is fun...at least that's what I keep telling myself).


The last day we always do a wordless craft.  This year's necklace was so cool!  Sharon (craft team member) stamped out "Jesus" on over 100 washers for the necklaces.  We had teachers and VBS helpers coming in and asking if we had extras because everyone loved them so much!  


I am so thankful I had the opportunity to serve in the craft room for VBS again this year. I get to use something I love (crafting) to help teach children about Jesus.  I love interacting with the children who sit at my table and getting to know them through the week.  It's exciting to see how creative they all are and all the different ideas they come up with...so inspiring!


Friday, July 26, 2013

Lawn Fawn at CHA


I've had a day home to recover from CHA.  I had such a blast!  It seriously was everything I dreamed it would be!  I am so thankful that Kelly and Mike allowed me to come and help them out at the Lawn Fawn booth.  I was an honor to be called a "Fawnie" for a couple days and to wear the Lawn Fawn cardi!

On Monday morning I got up and took a quick flight to Las Vegas.  My husband snapped this pic of me ready to go:


Mike picked me up and drove me over to the Convention Center.  The booth was all up and all the product was up on display.  They had already put out the card and project samples made by their amazing design team.  Those women are so talented!


They had also taken jars and used Lawn Fawn paper and twine to make them super cute.


Kelly snapped a pick of Nancy, Chari and I holding jars.  I snagged this pic off of Instagram:


Photo: Deb, Chari and Nancy: the booth decorating crew!

I know Nancy well now.  She and I have met several times while helping out Mike and Kelly with shipments and getting ready for trade shows.  I was super blessed to have her as my roomie.  While we were there, she was featured on the Hero Arts blog hop (check out her post here: http://happyheart-nancyljk.blogspot.com)...not only is she super nice, she is super talented!  Hoping some of it rubbed off on me!

Speaking of talented, I got to meet and know Chari.  She is on the Lawn Fawn design team.  I have always loved her cards and she was so fun to hang out with.  She has the amazing ability to take a stamp set and use it in a completely unique way.  Check out her blog here: mossymade.com.  Her husband Matt was also super fun...his humor mixed with his southern drawl had me laughing a ton!

Here is a pic of Nancy and Chari getting the make and take table ready:


Mike and Kelly, along with their business partner Erika, came up with amazing new products.  It was so easy to get excited about everything and share it with people. 

Here's a pic of all the new stamps and dies...so much fun:


And here is all the new paper and embellishments.  I loved both new lines so much!


I got to work on this chalkboard.  One of the hits of the show was the Yeti stamp set (check out a preview here: http://lawnfawn.blogspot.com  ), so I had to include him popping out of the corner!


Here are some other pics I snapped of the booth...tons of eye candy!


This pic gives you a good sense of what the whole booth looked like:


Kelly also had to do video shoots with different companies and she rocked it every time! Here's a pic from my phone:


I am so thankful that Kelly is my friend...love her!


Make sure that you check out the Lawn Fawn website at lawnfawn.com and check out all the new products!  

Sunday, July 21, 2013

Headed to CHA

Tomorrow morning I am grabbing a flight to Las Vegas and heading to CHA (Craft and Hobby Association Trade Show)!  Woo hoo!  I am so excited.  This is truly a dream I never thought would actually ever happen.
As I shared in an earlier post, I had an amazing scrapbook store to go to when I lived in Ohio.  I became friends with the women who worked there and we used to talk about CHA and how fun it would be to go someday...
I would also see tons of pics on my favorite paper crafting blogs from CHA and wished I could go.  The tricky thing about CHA is that you can't just buy a ticket.  You need to be a member or be invited by a company to attend...none of which I ever thought would be possible.  Oh, yeah, the show was usually far away like in California!
In January of 2012 my dream of attending came true.  I was now living in California and my friend Molly was able to get us tickets through her sister's business.  The show was in Anaheim so it was local.  I was so excited...I loved every minute of it!  I was like a kid in a candy store.  There was so much to look at and inspiration was everywhere!
So here is the amazing part.  While walking through the show I saw a booth for Lawn Fawn.  I had heard of Lawn Fawn through a favorite blog (jennifermcguireink.typepad.com) so I had to stop and take a look.  I met Mike one of the owners and soon found out that he and his wife Kelly lived very close to where I live!  Over the next year Kelly and I became good friends.
Kelly is such a sweetheart and I am so thankful to have her as a friend.  She lets me hang out with her and I always have so much fun!
So when Kelly and Mike invited me to help them at this summer's CHA show I was so excited!  I can't believe that I get to go. 
I will be snapping a ton of pics and blogging about my whole trip when I get back.  Now I need to finish getting packed and sneak in extra snuggles with Cole before he goes to bed.

(sorry for lack of pics, I will make up for it in the next couple posts!)

Wednesday, July 17, 2013

I Love Making Cards

This is just a quick post.  Here's a card a made for a friend recently...actually, I need to remember to mail it!


I would love to post a card a week...not sure if I really have the time, but I'll give it a try. 

Happy Crafting!